Showing posts with label create. Show all posts

DIY Fever: Upgrading Your Home On A Budget


I'm completely and uncharacteristically obsessed with fixing up my house right now.  Actually, I am completely obsessed with moving a little further out of town and getting a few acres where my daughter and I could have a hobby farm ... BUT that's not happening anytime soon.  It must be spring fever.  I detest gardening, but each spring when there's a little green on the hills and some blossoms on the tree, I find myself pruning or edging the lawn or shaping the tree while the kids play outside.  But this year I've got the itch to remodel.  I've got it bad.  We can't afford to buy a charming little ranchette nestled in the foothills, so I decided to turn the house we have into something fantastic.  Besides, even if we could afford to move right now, I realized how much we would have to do just to sell this house and thought, we might as well enjoy the upgrades, too!

Easy Hi-Low Half-Circle Skirt


Circle skirts are so swirly and swingy.  And circle-y.  It's pretty much essential for any girl or woman's wardrobe.  You can achieve more or less fullness by making it half circle or a full circle skirt.   This went from a simple tutorial to an in-depth explanation and how to make both with regular and asymmetrical hems... and back to simple again.  Mostly I want to show off this cute hi-low skirt I made for my daughter, and the hi-low pertains to the short-in-the-front-long-in-the-back-hemline of course.   I'm so pleased with how it came out.  Make one today!  My model won't cooperate which is why I hung the skirt in a tree, one of the more rustic and country looking parts of my yard (except for the neighbor's house in the background, of course).

An Unfinished Soldering Project

I couldn't wait to start soldering this weekend... I had a whole bunch of picture frame glass leftover from my earring board project, so I'd been racking my brain for ideas to use the glass. I took a stained glass class in college, and decided to pick up a super cheap soldering iron on sale for $5 at JoAnn. I picked up some copper tape and a spool of solder at Hobby Lobby, and ordered some flux on Etsy and I was set.  It sounds like a lot but once you get the bug to make something, there's no going back. 

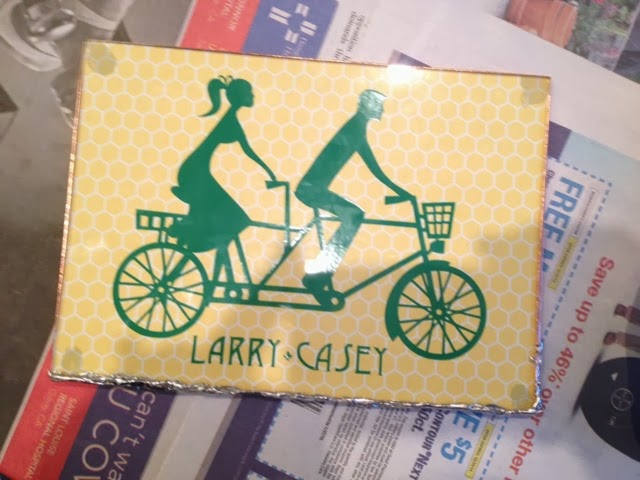
I needed to make a late Christmas gift for my dad and his girlfriend -- they are active, beach bum types.  I used my Silhouette Cameo to cut this cute vinyl sticker of a couple on a tandem bike (#27595 in the Silhouette store online), and added the lettering. 

Free Doll Clothes Patterns (I'm Slightly Obsessed)


If you're a Facebook fan you may have caught my post about these adorable doll clothes patterns that have driven me closer to becoming a "crazy doll lady".  I think it has to do with the fact that my 9-year-old daughter doesn't let me dress her up and do her hair. Anyway I fell in love with the Liberty Jane Patterns for 18" American Girl (R) sized dolls (available at Pixie Faire). I wanted to show how I used their free pattern for a "trendy tee" to make a tank dress. 

Sure, I can get doll clothes patterns from McCalls or Simplicity on sale at JoAnn for $1... but these are SOOO much easier than using old school tissue paper patterns for doll clothes -- I honestly prefer downloading/printing/cutting.  I have also found that the Liberty Jane clothes fit better. 

I made a couple shirts and tanks with the pattern as-is, and I just lengthened it by a few inches to make a dress. I made the bottom about 1/2 - 1" wider too. 


Sorry about my foot photo-bomb there.  

The best part is that I upcycled a shirt so I didn't have to do the hem! 

I forgot to cut the back in two pieces but it was better that way for a dress, so I just cut a slit in the top. 


To make it a tank top, just leave off the sleeves and double fold the arm opening.  Click here to see how I do tiny rolled hems.


Liberty Jane has a free dress pattern, and a couple more freebies if you sign up for their newsletter. The other pattern I highly recommend is the UK Holiday Top & Leggings (my version shown in the blurry photo below) and the Harajuku Skirt (not pictured):


By the way, some patterns are free all the time and some were free for a day. 

Are you a total nut about making doll clothes?  Go check out these patterns and you will be!

Operation Burlap Placemats: 4 Ways To Sew Mitered Corners


Placemats are something I don't give much thought to, probably because I never use them. I have some red chargers that I use at Christmastime and that's the extent of table accessories at my house. My mom, however, uses placemats at almost every meal. I love that, and the way she always puts a large plate under the soup bowl or salad plate, which I usually skip because it just seems like more dishes to wash. I should take the time to do that more. She has been using these rabbit placemats for years and years, they are really thick sort of like chipboard, and have a wipeable surface. So I made her these to change it up a bit.  These are burlap and cotton wih mitered corners, very natural and kind of French. The cotton border is teal with gold flecks. 

Finally Found A Way To Sew A Narrow Hem (That Doesn't Make Me Want To Rip My Hair Out)


At last!  I figured out the best way to do a narrow rolled hem. I made lots of doll clothes for my daughter for Christmas and I was going crazy with all those tiny hems!!!  I have a narrow hemmer foot but it's hard to get started and I can't get a consistently even hem. I tried pressing the seam allowance and then rolling the edge in to the crease but my fingers are too big and clumsy. So it finally occurred to me to just fold and stitch twice!

43 Project Ideas for Silhouette Cameo (Pin This!)


I debated calling this "43 reasons to get a Silhouette"...  If you're thinking about getting yourself a Silhouette (you should! and use my affiliate link please!) or you have one and you're not sure where to begin (it can be overwhelming), here are a variety of super creative ideas to get started.  Most have links to tutorials, but some are just eye candy.  I spent WEEKS putting this together so, for heaven's sake, the least you could do is pin it for later ;)  


Installing Snaps The Ol' Fashioned Way, With A Hammer


I'm not sure if "installing" is the right word, but here goes.  Different snaps may require different tools (for example, I haven't figured out how to put in a pearl snap without cracking it), and you can even buy snap tape... but I put in snaps the ol' fashioned way.  I have tried that plier/hole punch looking tool but I couldn't get the snap to align properly. I bought the package of snaps at Wal Mart that comes with the tool, and now I buy snaps in bulk but I still use the same tool.  I put snaps in my Irish flat caps, so that is what you will see in the examples.

Basic (But Not Too Basic) Design Functions With Silhouette Studio


If you're ready to move beyond downloading a shape, resizing it and cutting then you will appreciate this post.  I just took some screen shots showing some of the things you can do with the Silhouette Design Studio - Group, Ungroup, Weld, Subtract, Offset, Knife/Slice, Compound Paths, Align and Curved Text.  Just basic stuff, but some neat tricks that might take a while to figure out on your own (I learned a lot of this by pouring through countless tutorials online, hopefully this saves you the trouble).

Finally! Paper Cutting Success With Silhouette Cameo & How To Use Weld And Offset


Cutting paper has been one of the most frustrating tasks with my Silhouette Cameo!  (affiliate link) I suppose that's because there are so many kinds of paper so you have to keep tweaking the settings.  Today my patience was rewarded with my first major success.  I had to write it up quick before I forgot everything and I figured I would turn it into a little demo using some of the basic tools in the Silhouette Design Studio while I was at it.

Printable Heat Transfer With The Silhouette Cameo Using Registration Marks

This post contains affiliate links :)

Did you ever get a care package in college?  I remember the time my mom sent me the best. cookies. ever.  I'm putting together a care package for my cousin who is a freshman at UNLV. She's still living at home, and I thought she especially needs a care package so she doesn't feel like she's missing out on the dorm experience. She's very health conscious so I packed her favorite dried mango and toasted seaweed from Trader Joes, some makeup, and I made her this shirt.  Not the most academic of care packages.  The design is inspired by the tattoo she wants, an American Traditional heart and banner that reads "Rudig girl" - Rudig being our mothers' maiden name, and the Rudig sisters (our aunts) being three strong, capable chicks.

If you don't know much about heat transfers, you can do it a couple different ways.  You can buy heat transfer vinyl in different colors, and even layer them if you want... or you can use printable heat transfer paper that allows you to print the design with an ordinary inkjet printer.  The printable option is nice for designs with more than one color if you don't want to deal with separating your design by color and cutting/applying multiple layers.  Printable heat transfer is also a good option for designs with shading, like the heart and bird in my design.

Calling All Nerds: Captain America USO Girl Costume


An old highschool friend of mine requested that I make this USO Girl costume as a surprise for this his wife.  Awwwwwww!  Apparently they are comic book... enthusiasts (I didn't say nerds). I've never done anything like this, but I did a little research and took on the challenge. Here is the picture he sent me, which is displayed much more nicely than mine:

How To Make A Pre-Tied Bow Tie For Babies and Kids


I started making suspenders and bow ties to go with the flat caps I sell on Etsy, they are so perfect together! I took some pictures to show how I make bow ties, step by step.  I watched several tutorials and used the method from the video below, with my own measurements for kids and a couple extra tricks of my own.  It's a long video but his accent is just lovely :)

The Ridiculous Patent on Sensory Blankets & Toys (and How to Make Your Own!)


>>> Loopy Blanket Giveaway is over! <<< 

I will pick a FOLLOWER at random on 12/17/13.  The winner will be announced in a new blog post so make sure to "Activate" your subscription and check your Inbox!  To enter, use the box in the sidebar or follow this link: Subscribe to Coconut Love by Email  
.....

I admit, even though it's been a year this still gets me all riled up. Let me start at the beginning... Once upon a time I opened an Etsy shop and I listed some loopy blankets and toys that so many people sell. One day I received a message via Etsy from a third-party legal representative informing me that I was in violation of copyright infringement, or something to that effect.  Apparently one of the big toy manufacturers patented sewing ribbon loops or anything like it in the seam of a a blanket, like this:


And toys, like this:


Now I think this is the silliest thing I have ever heard.  It's almost like putting a patent on the way you put in a zipper or finish a seam.  It's a technique.  But far be it from me to fight The Man or find a loophole (hahaha no pun intended!) so I complied like a good shop owner and took the listings down.  That was before I found my niche in baby flat caps (plus there are SO many Etsians selling blankets that is is hard to compete).   I'm over it.

But I want to show you how easy they are to make - it's a great beginner project.  I'm actually going to cheat and give you links to a couple of my other posts.  Follow the directions to make a regular minky blanket.  It's doesn't have to be minky and cotton:  I recommend at least one side be minky, flannel, ultra cuddle or something soft, and the other side could be cotton or satin (or make both sides cuddly!).

After you have your fabric cut and before you sew the layers together, make ribbon loops (just fold the ribbon in half) and pin them around the edges of the blanket, but they should be facing in with the ends lined up with the edge of the blanket, like in my taggie toy post.  Here's a picture of how the ribbons go:


If you want more sensory-ness, slip a wooden ring or bead on the ribbon loop before you sew. Be careful of choking hazards and chemicals, duh.

If you like you can baste the ribbons in place on just one piece of the fabric before you sew the two layers together (like I have done in my picture), because when you sew the blanket right-sides-together and the ribbons are in-between it's easy for them to slip out of place.  Up to you.  I like to triple stitch the ribbons since they will be tugged on.

I have to say to be careful with loops.  Once, in her sleep, my daughter got her finger twisted in the loop of a bow around her teddy's neck ALL NIGHT which could have been pretty serious.  If you just want ribbons sticking out instead of loops, here's a cool tip:  To keep the ribbon from fraying, quickly run the flame of a lighter across the ends and it will melt and seal the edge.  This would be a cute way to make an animals tail or doll hair too.

You can sew other trims in a seam the same way (in-between the layers, raw edges aligned), like ruffles or the rope and fringe on my cowboy & cowgirl blankets:


That's how easy it is to make your own taggie blanket!

Since I can't legally sell the airplane one that I made, I'm giving it away!  I already have a minky blanket giveaway going on so follow Coconut Love on Blogger or Facebook for details on how to win this airplane loopy security blanket a little later on...  The contest is on...

This airplane blanket is a small, security blanket size taggie with ribbon loops on one edge.  It has minky on one side, and it's perfect for the carseat, peekaboo and traveling everywhere with your little guy.  

To enter, subscribe to receive Coconut Love posts by email (in the side bar)  or click here:


Don't worry, I only post about once a week so I won't clog up your email :)

I will pick a follower at random on 12/17/13 and announce the winner via new blog post, so make sure to "Activate" your subscription and check your Inbox to see if you won.  If you like you can always leave a comment to let me know that you're following.


Thanks for visiting!


Easy Silhouette Cameo Project - Personalized Doggie Vinyl Window Sticker


I admit I totally copied this idea from places like this on Etsy, but it was a really fun, easy project to break in my Cameo.  Sorry I didn't capture the whole process with photos - if you know a little about the Cameo it is easy to figure out.  This is the perfect beginner project -- if you don't have your Silhouette yet, I'd appreciate you using my affiliate link!

New Toy! Fabric Tube Turner


Remember my post about using two pencils to turn fabric tubes? And how I mentioned that I wanted a tool I saw on Sew It All (PBS) that looked like curved scissors/tongs?  Well my dearest mommy got them for me for my birthday - yippee!  And here's how it works:

Zipper Lunch Box Tutorial


I think I spent twice what a store-bought lunchbox would cost, but at least my daughter got to customize the fabrics and I got to try something new!  I was hoping for some cute oilcloth or cotton laminate for the inside, but JoAnns selection was lacking so I tried Pellon Vinyl Fuse with some home decor cotton instead. My daughter was very specific in the style she wanted which it so happens is a pretty classic lunchbox (as opposed to a bag style like my Cowboy Velcro Lunch Sack). I based the dimensions (8 x 5.5 x 5.5") on this promotional Oakland A's freebie that we have that fits her reusable sandwich box, thermos (we do soups and chili a lot) and a bottle of water perfectly.

Awesome Chunky Chain Bracelets


I had another Pinterest attack this week. I made these chunky chain bracelets with my little cousin.  Well, she is 18 -- but I'm 36, hence "little".  Plus she is short, so it fits.  Moving on!  We found some super chunky chain at Hobby Lobby in the fabric section with the ribbon, one yard makes 4 bracelets.  They only had shiny gold color, but I prefer more tarnished looking gold tones or silver so I'll have to keep an eye out for where I can buy more chain like this.  We also got some suede cord and a toggle clasps. You could also use strips of fabric, ribbon, lace, and silky cord too.

Three Shabby Chic Fabric Flowers To Make


I had a little fabric flower obsession this weekend and looked at tons of tutorials and got out my fabric scraps.  Flower accessories are essential for baby girls, but I also like how they look clipped into a messy bun or adorning a pillow or beautifully wrapped gift.  I prefer the soft, loose, frayed, antique-looking kind of flowers. Here are three shabby chic flowers and how to make them.

Flower #1 The Pansy