


Placemats are something I don't give much thought to, probably because I never use them. I have some red chargers that I use at Christmastime and that's the extent of table accessories at my house. My mom, however, uses placemats at almost every meal. I love that, and the way she always puts a large plate under the soup bowl or salad plate, which I usually skip because it just seems like more dishes to wash. I should take the time to do that more. She has been using these rabbit placemats for years and years, they are really thick sort of like chipboard, and have a wipeable surface. So I made her these to change it up a bit. These are burlap and cotton wih mitered corners, very natural and kind of French. The cotton border is teal with gold flecks.

The mitered corners were a challenge. I spent an evening making my own interfacing-backed bias strips, thinking I would use what I call the "sew and fold" method but, in the end, didn't need to go to the trouble. With the sew-and-fold method you use one long strip of bias tape and strategically fold the around the corners. It was difficult either because of the 3 inch thick border or because I'm inexperienced, I choose to believe the former. I am not a quilter and my pieces were not cut to precise lengths, so I'm sure that contributed to my difficulties. In my research I found 4 ways to sew mitered corners, two are sew-and-fold and the other uses strips for each side.

#1 Here is a good tutorial where you sew the first side folding corners as you go, then fold over and sew the other side.
#2 And here is another one that shows you how to use double fold bias tape to encase the edges only sewing once.

#3 Is where you use 4 separate fabric strips instead of bias tape and then sew the corners together at a 45-degree angle.


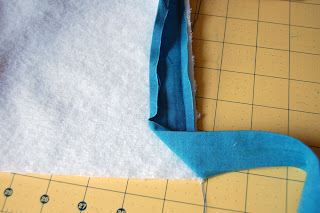
I used method #3 but I modified it slightly. I didn't want raw edges, so I made the strips 2x width and folded them over and found a way to fold the corners to a point, kind of like with method #1.

#1 Here is a good tutorial where you sew the first side folding corners as you go, then fold over and sew the other side.
#2 And here is another one that shows you how to use double fold bias tape to encase the edges only sewing once.
#3 Is where you use 4 separate fabric strips instead of bias tape and then sew the corners together at a 45-degree angle.
I used method #3 but I modified it slightly. I didn't want raw edges, so I made the strips 2x width and folded them over and found a way to fold the corners to a point, kind of like with method #1.

The quilting or topstitching wasn't intentional. Because my strips weren't cut perfectly, they were a bit wavy. The topstitching helped give some structure. In the end I was pleased, it it what I had envisioned. The bad news is that even with a whole yard of fabric I only had enough to make two! So I added a fancy wine topper and a bar of dark chocolate and said the theme of the gift was "lunch with a friend" :) But it was a fun learning experience and I thought the least I could do is share with you the four methods I found for making mitered corners :) If there's another way that you'd like to share in the comments, please do!

No comments:
Post a Comment
Comments are very much appreciated!