

My best seller on Etsy is the baby flat cap. You know, the Irish hats that 90% of old men (and hipsters) wear - also called newsboy hats as well as other names. I made the first one for my son because they're pretty hard to find, which is why they've been selling pretty well, I suppose. They've evolved over time, and I take great care in the details that make them special.

I kind of prided myself on not being an assembly line kind of shop and offering all the same stuff in all the trendy fabrics (ahem *chevron* cough). BUT I love requests for custom orders and that is how I made my first pair of suspenders! They are so darn cute and go so perfectly with the hats... So now they are a permanent fixture in my shop!
 |
| My First Pair *sigh* |
Then it happened again. I started receiving requests for bow-ties. Another old man/hipster trend. But again, so stinking cute! And they totally go with the hats...

I'm guessing neck ties will be next.
So I guess I'm jumping on the bandwagon. You gotta give the people what they want! Now that I've justified my selling out, let's talk suspenders.
I read through several tutorials, as I always do, and I can't seem to find them again to link up to them - but the two I liked best involve turning a long skinny fabric tube which is possibly one of the most frustrating thing ever. One way you make an open tube and press with the seam in the middle of the back of the strap (you can see that in my photo of the argyle suspenders a little ways down) and the other way you make a closed tube and turn, then make sure to close the opening when you topstitch (practically impossible to get perfectly straight!) Plus, scrunching up the fabric in the tuning process makes it wrinkly, and the interfacing seems to make the wrinkles very resistant to pressing. And, sorry folks, but I cannot stand any elastic in the back of the suspenders like many tutorials out there, I think it is a huge eyesore. So I had to find a better way. I am now realizing that my way requires very little sewing. Just some pressing, some quick topstitching, and zigzag-ing a couple ends.
You need two long strip of fabric that are around 25" long for a baby/small toddler size and around 30" long for an older toddler/child (measure waist-over the shoulder-waist plus 5 inches for accuracy), and 4x the desired width (my hardware is 3/4" so my strips were 3" wide). If you are working with a linear pattern and want to center the design in the strap you have to cut/press/fold your straps very carefully (like this plaid/clover print):


To get started...
- Fold strap in half lengthwise - press and unfold (you just want a center crease)
- Fold the ends in to the center crease and press
Yes, you have just sorta kinda made double fold bias tape!

In order to prevent the layers from shifting as you top stitch the long sides, you sneak a little hem tape in between and iron to fuse them together. This way you don't need interfacing and you don't have to press out any stubborn wrinkles! I got this funky netting type hem tape at Ikea, and when I ran out I found this Heat n Bond tape at JoAnn in the notions aisle:
 |
| from Ikea |


You'll notice I didn't do any fancy folding on the ends, it is just a raw edge. I'll show you how we finish the raw edges in a minute. We're dealing with 4 layers of material, and if you fold the edge in it's just too bulky. Make sure to trim ends so the straps are even and you don't have any fraying going on. Top stitch the long sides.

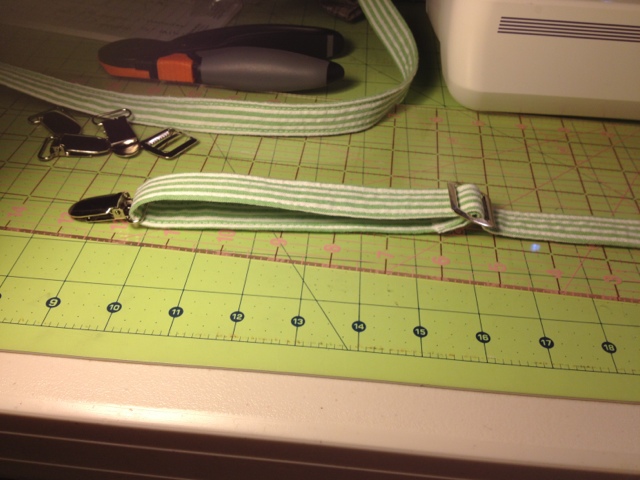
Now for threading the straps through the hardware. I'm using two 3/4" vest buckles and four 3/4" suspender clips. Soon I'll do an update on using real suspender slides (and here it is - How To Thread Suspender Slides!). You can do a Y-back with 3 clips but I prefer this way for little kids. I got my clips from Bree's Basement on Etsy :)

The buckle has a front...


Fold the end of the strap down about an inch and sew a tight zig zag or satin stitch. (Before I was doing a rolled hem and a neat row of triple stitching, but I saw this done on some fancy menswear designer's neckties, and I thought it would work great here). This way eliminates bulk. You will need to make sure the buckle clears your sewing machine's presser foot so that it feeds smoothly and you don't risk breaking a needle.


Now thread the other end of the strap through the suspender clip back to front, check the picture to make sure the clip and strap are facing the right way.

And back through the buckle: up through the bottom and down through the top:

And now you have this:
Time to attach the other suspender clip to the other end. With right side up, thread the strap down through the clip, front to back, like the photo. Zig Zag the raw edge in place.


When you do the 2nd strap, make sure your lengths remain even when attaching both clips.

Now take your straps, and criss-cross the ends farthest from the buckle. Space them approximately 2-3" apart, and make the X approximately 4" above the clips. It is best if you can try them on the child to see exactly where you want it to cross.

And stitch in a diamond pattern to secure the X. FYI there are these triangle thingies you can buy to thread the straps instead, I think this makes the back adjustable as well.

And now you have one cute little pair of suspenders!

Why not make a matching hat and bow tie, too!

You could absolutely use pre-made double fold bias tape, or ribbon, or the more traditional elastic for that matter, for the straps. I hope this was helpful - let me know if you try it!
In case you missed it in the post, here is the link to the tutorial where I show how to make these with real suspender slides.
Thank you so much for this tutorial! I looked at a few others like you said and this one was super easy. I made a pair during Kids Clothes Week this past week. Can not wait to have my son wear his.
ReplyDeleteThanks Candi, I'm so excited that this was helpful! You should share a pic of yours on my Facebook page!! facebook.com/coconutxoxo Thanks for commenting :)
DeleteI am wanting to make these suspenders for the look but also want them to hold up the boys pants. When the kids bend over do the suspenders slip off? Thanks
ReplyDeleteHi Charie! I haven't had any complaints about slipping. If you mean the straps slipping off the shoulders, making the straps criss-cross higher on their back should help. This is why it helps to try them on as you're finishing them! I don't think you will have problems with the clips slipping off the pants. Good luck and thanks for leaving a comment!
DeleteThanks for this great tutorial! I can't wait to try my hand at it! I have two grandsons and some friends who are wanting some. I have tried making a hat, but I think I used interfacing that was too stiff. I want to try that again. If you have any tips for the hat, I would love to see those, too. Thank you, again!
ReplyDeleteHi Salsuzie! Thanks for the comment. The fabrics I like best for the flat caps are usually drapery/upholstery weight and sometimes even have a fuzzy backing on it. Tweed and corduroy usually have enough oomph as well. If there's a thin fabric I want to use, I will use fusible fleece interfacing. I might be sharing or selling my flat cap pattern in the future if you want to stay tuned.
Deletei do plan on trying this! Do you know where i can get the buckles from? I checked etsy and a search didnt really bring anything but maybe i am looking for the wrong thing! Or i suppose any other online shops as i am in Australia :) Thanks very much :)
ReplyDeleteIn the US we have JoAnn, Beverly's and Hancocks as the big fabric chains. In this tutorial I used "vest buckles" which you should be able to find on Etsy as well. The clips are just called "suspender or mitten clips". Both should be in the notions aisle. For suspenders you could also check Etsy for "suspender slides". I plan on posting some pictures showing how I use those soon, pretty much the same as the vest buckles. Just make sure the widths are the same on all the hardware :) Hope that helps.
DeleteI love these, thank you for sharing! I made an adorable pair for my sons birthday!
ReplyDeleteI can't wait to make these. I'm a newbie at sewing and this makes it look a little simpler. Do you also have a tutorial on how to make the toddler bow tie? I know how to sew a men's self tie bow tie. But I can't imagine trying to tie one of those on a toddler?!
ReplyDeleteHi Christy! Here's the link for a kids' pre-tied bow tie: http://coconutxoxo.blogspot.com/2013/09/how-to-make-pre-tied-bow-tie-for-babies.html?m=1
DeleteI am literally making my first self-tie bow tie as I write this (ok, just BEFORE I started writing this!). The self-tie is SO MUCH easier and in my opinion looks better. The pattern I have uses hardware so that once it's tied you can take it off and on and adjust it without untying it - great for kids and cleaning. The pattern is from LavaGuy and it's only $1.29, here's the link: http://shop.lavaguy.com/printable-templates/
Thank you so much for the comment! Have fun making the suspenders, they are so adorable!
Thanks for the plug, Maureen! Great tutorial on suspenders, too!
Deletethank you :) where do you get the slider vest buckles? saw some on etsy but just wondered if you knew where else to get them cheaper. maybe they have a different name. thanks so much for sharing
ReplyDeleteHi Stephanie :) I usually get my supplies on Etsy and find the prices to be pretty good compared to retail stores. When you search "vest buckles" on Etsy LOTS will be there. If you are going to the trouble of ordering online, I would go for the "real" suspender slides that I use in this post ( http://coconutxoxo.blogspot.com/2013/12/how-to-thread-suspender-slides.html?m=1 ) I got those slides from Crafty Mumchkins on Etsy. Thanks for the comment!
DeleteThank you so much for sharing this fantastic tutorial. I have just made three pairs for my grandchildren to wear at my daughters wedding and they looked so cute and gorgeous. I am in Australia and thought you should know that you helped me out in achieving the look we wanted for a special event.
ReplyDeleteI so appreciate that Glenda! Glad it was helpful. I really do think it's the best way.
DeleteMy son has asked for suspenders several times recently. The thought of messing with a tube that long had me putting him off. Your idea is great! I could even be tempted to use bias...I won't be that lazy. He is going to be so excited. Thanks for figuring out an easier way!
ReplyDeleteHow cute that he wants a pair!
DeleteHello!
ReplyDeleteI absolutely suck at sewing and can't find anyone that can do it. Is there a way I could place an order? Im in desperate need of something for Easter. Could you email me? gelsey.cole91@gmail.com
Yes I do take custom orders! I emailed you.
DeleteI'm loving this pattern! Excited to try it out. What type of material are you using? Have you found what works best? Thanks
ReplyDeleteI prefer cotton and linen. The cotton can be quilting weight or bottom weight. Bottomweight looks very crisp and sturdy but sometimes my machine can't handle all the layers. Linen is probably my favorite. Thanks for the comment!
DeleteThese are adorable. I have to make a pair for my grandson and this is exactly what I have been looking for. Thanks for sharing.
ReplyDeleteDo you have a pattern for the hat? I would love to make my twins some for easter! Willing to purchase a pattern if need be. :)
ReplyDeleteHi Lydia! I'm working on publishing the hat pattern. If you are interested in being a pattern tester, you should "like" my Facebook page: facebook.com/coconutxoxo
DeleteThank you so much for this! They were super easy and they came out just perfect! :)
ReplyDeleteOh goody, thanks for reporting back :)
DeleteHe he ;) Thanks for the fab tute. You have made it look so much easier to make them. I might have to make a few pairs for my boys! Cheers, Bec :)
ReplyDelete